This guide explains how to manage firewall rules using the control panel or Windows Server Firewall, including the basics of windows server firewall configuration and how both systems interact.
1. Two-Layer Firewall Architecture
Your server environment includes two different firewall layers:
- 1) Control Panel Firewall – Operates at the hypervisor level. Traffic is filtered before reaching your Windows Server.
- 2) Windows Firewall – Runs inside the operating system. Traffic is filtered only after it arrives at Windows.
2. Enabling the Firewall in the Control Panel
From your server management interface, navigate to the Firewall Rules tab to enable the firewall and define inbound or outbound rules.
2.1. Turning the Firewall On/Off
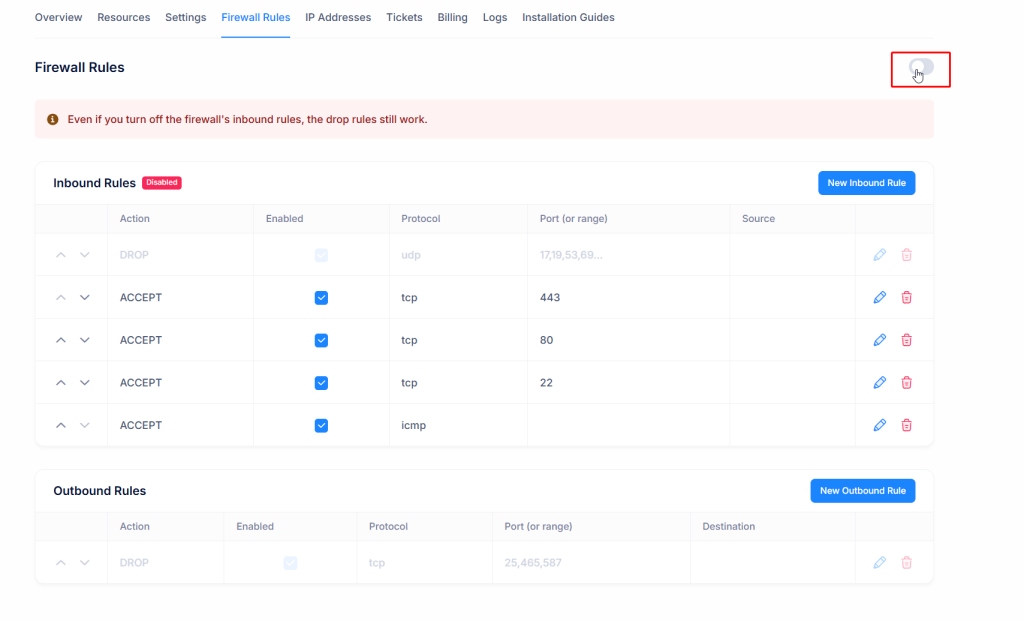
- Open your VM in the control panel.
- Go to the Firewall Rules tab.
- Use the toggle switch in the top-right corner to enable the firewall.
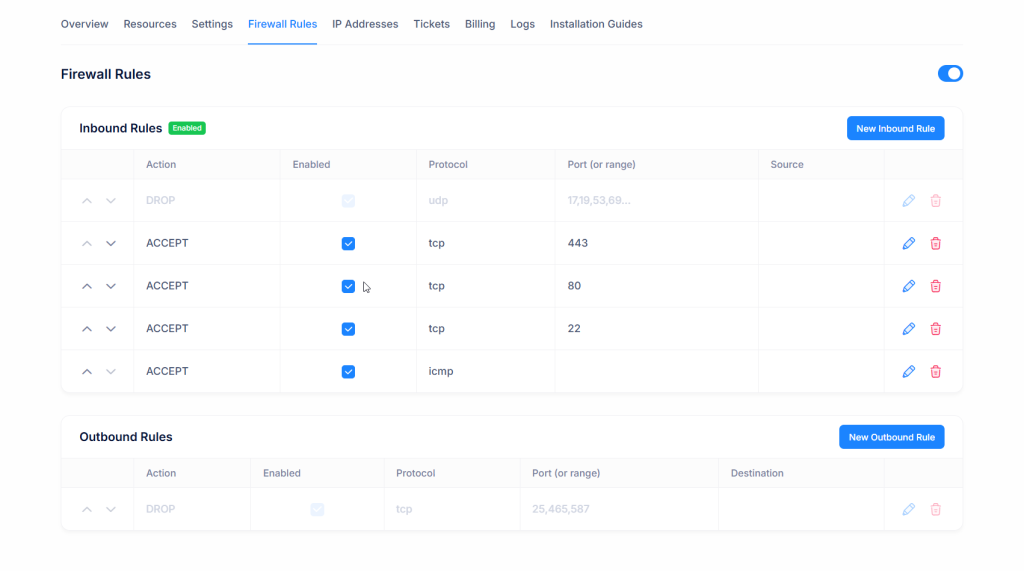
When the firewall is enabled, all inbound rules listed on the page are applied. For example:
- TCP 443 (HTTPS) – ACCEPT
- TCP 80 (HTTP) – ACCEPT
- TCP 22 (SSH) – ACCEPT
- ICMP (Ping) – ACCEPT
2.2. Adding New Inbound or Outbound Rules
To open or block a new port:
- Click New Inbound Rule or New Outbound Rule.
-
Configure the following fields:
- Action: ACCEPT or DROP
- Protocol: TCP, UDP, or ICMP
- Port (or range): Single port (e.g., 3389) or a range (e.g., 10000–20000)
- Source/Destination: Optional IP or IP range
- Save the rule and enable it using the checkbox.
3. Relationship Between Panel Firewall and Windows Firewall
You may use either the control panel firewall or Windows Firewall—or both. However, to avoid configuration conflicts and unnecessary complexity, we recommend choosing one of the two methods. Proper windows server firewall configuration requires a clear and consistent rule set.
3.1. Recommended Usage Models
-
Option A – Use the Control Panel Firewall (Recommended)
- Enable the firewall in the control panel.
- Manage all port-based rules from the panel.
- You may disable Windows Firewall or leave it with default settings.
-
Option B – Use Windows Firewall
- If you prefer to manage rules inside Windows Server,
- We recommend disabling the control panel firewall.
A DROP rule in the panel firewall will block the connection entirely, even if the same port is ALLOWED in Windows Firewall. This behavior is crucial to understand for accurate windows server firewall configuration.
3.2. Why Not Use Both Firewalls Simultaneously?
- It becomes difficult to determine which firewall is blocking your traffic.
- A restrictive panel rule can prevent traffic from ever reaching Windows.
- Troubleshooting takes longer and increases configuration complexity.
For this reason, we strongly recommend managing firewall rules from only one layer at a time.
4. Example Scenarios
4.1. Hosting a Website (HTTP/HTTPS Only)
- Enable the control panel firewall.
-
Add inbound rules such as:
- TCP 80 – ACCEPT
- TCP 443 – ACCEPT
- TCP 22 or TCP 3389 for server management
- Windows Firewall can remain default or disabled.
4.2. Managing Firewall Rules Only From Windows
- Turn off the control panel firewall toggle.
- Manage port access exclusively from Windows Defender Firewall.
5. Frequently Asked Questions (FAQ)
Q: What happens if both the control panel firewall and Windows Firewall are enabled?
A: Traffic is filtered by the control panel firewall first. If blocked there, it will never reach Windows. This may lead to confusion when troubleshooting.
Q: Is the control panel firewall secure enough to use alone?
A: Yes. When configured correctly, the panel firewall provides strong protection and simplifies management.
Q: If I disable the control panel firewall, will all traffic be allowed automatically?
A: No. Traffic will then be controlled solely by Windows Firewall or any security software running inside the server.
For more details, see Microsoft’s official documentation:
Windows Server Firewall Configuration Guide
For related topics, also see:
Windows Server Installation Guide